

Enabling the DMZ feature on your Linksys cloud account

The Demilitarized Zone (DMZ) is a feature that allows devices in your network to be stripped off its external firewall and be exposed completely to the internet.
Do you need it?
A DMZ helps electronic signals bypass strict firewall and router security and open all ports for faster delivery of data packets. It is an easy way to enhance connectivity such as when you play online games, transfer files over the internet, or create a website on your own server, and the like.
The main disadvantage of a DMZ, however, is that it leaves a computer open to all, which may entail leaving data within it open to intruders. You will need to proceed with the DMZ setup with caution. You can use port forwarding as an alternative to DMZ as it creates a rule to open a certain port or a range of ports that receives only a specific data request. Learn more
Below is the list of things to remember when you enable the DMZ feature in your Linksys router.
- If you decide to use the IP address, be sure to set up a static IP address for the computer that you want to expose because its IP address may change if set to DHCP. You can also specify by MAC address.
- Alternatively, if your router has a DHCP Reservation feature, you may also use it instead of setting up a static IP address on your computer.
To start setting DMZ, follow the procedure below.
This feature is not available on the Linksys app.
1. Log in to the router's web interface.
You can also log in to the router's web interface by typing "http://192.168.1.1" in the browser's Address bar.
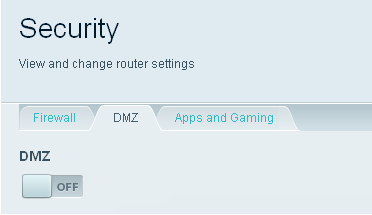
2. Under Router Settings, select Security.
3. Select DMZ from the tabs and toggle to the ON position to enable the DMZ feature.
4. Select the option for the Source IP Address and enter the correct values required.
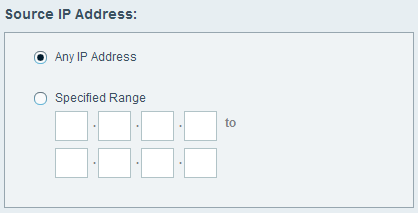
- Any IP Address - If you want to allow any external computer to access the exposed computer. This is best chosen if you use your computer as the server and have multiple users trying to access it.
- Specified Range - For a more secure DMZ setup, you can select the second option where you will be able to specify a range of IP addresses that will only be allowed entry to the computer’s DMZ. IP addresses that are not in the range will not be allowed to connect.
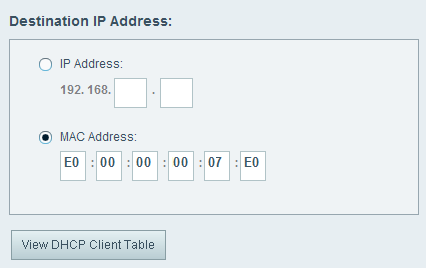
5. Enter the Destination IP Address. This is the IP address of the computer you’ve set up for DMZ.

Alternatively, you can also select the MAC address radio button and manually enter the MAC address of the computer you are setting up for DMZ.
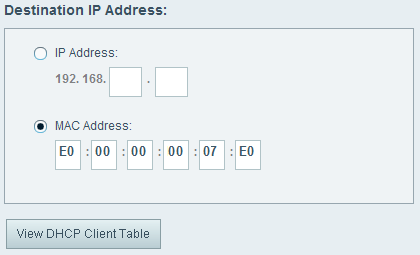
Aside from manual entry, you can also automatically populate the MAC address by clicking on the View DHCP Client Table button and clicking on the Select button of the corresponding client MAC address.
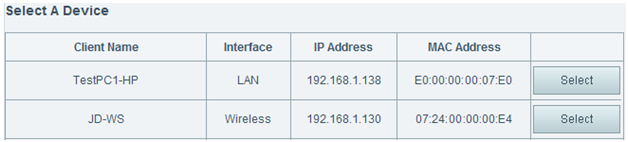
The MAC address of the device will be extracted automatically.
6. Once you’re done, click Apply to save the changes and then click Ok to exit.

