


Setting up the Linksys Smart Wi-Fi Router is made easy using the Smart Setup Wizard using a compatible web browser. The Smart Setup Wizard is embedded in the firmware and is available even if the router does not have an internet connection or is in its default settings.
This article will guide you on how to set up your Linksys Smart Wi-Fi Router using the Smart Setup Wizard. The Smart Setup Wizard is supported by all Linksys Smart Wi-Fi Routers.
Smart Setup benefits
- You do not need a setup CD or additional software to set up the router.
- You have the option to directly access the router’s web-based setup page while going through the setup process.
Requirements before setting up your router
The following requirements should be met to avoid any problems during the setup:
- Browser requirements for the router setup and web interface access:
- Microsoft Edge™
- The latest version of Chrome™ and Firefox®
- Safari® (for Mac® or iPad®)
- Latest Adobe® Flash® Player
- Setup materials – You should have the following items:
- Linksys Smart Wi-Fi Router
- One or two internet/ethernet (RJ-45) cables
- A WiFi computer or a computer with an ethernet port
- Active internet connection – To check if you can access the internet, connect the modem to the computer using an ethernet cable as shown in the image below:

I don’t have a modem. Are there any other alternatives? Yes. What you can do is to connect the cable (also called a patch or a fiber optic cable) provided by your internet service provider (ISP) directly to the computer’s ethernet port. If your internet access is working, you can begin by following the steps below.
1. If your router came with external antennas, connect the antennas to the router first and then plug the router into a power source. If your router has a power switch, make sure that the power switch is set to the | ON position. Wait until the power light indicator is solid.
2. Connect the ethernet cable from your modem to the internet port of the router.
3. Connect to your secured WiFi. You can locate the WiFi credentials either at the bottom of the router or on the Quick Start Guide. To prevent any problems during setup, make sure you have a good signal from the router by bringing the computer closer to it or moving the computer to the same room as the router.
If you are using a wired computer, skip step 3 and proceed to step 4.
4. Launch your web browser and enter the default IP address of the router, "192.168.1.1", or type "myrouter.local" in the browser's Address bar.
If you prefer to manually set up the router and bypass the Smart Setup Wizard, click on the Manual configuration link at the bottom.
On some Linksys Smart Wi-Fi Routers you will see a checkbox I want to skip Setup and configure my router manually. Tick this option and click Next.


For Digital Subscriber Line (DSL) users, the setup will prompt for the Point-to-Point Protocol over Ethernet (PPPoE) Account name and Password. Enter the necessary information, then click Next to continue.


7. Enter your desired Wi-Fi Name and Wi-Fi Password in the fields provided, and then click Next. Unlike the 2.4 GHz Wi-Fi Name, the 5 GHz Wi-Fi Name will be appended with the _5GHz suffix.
If you want to use a singular name for both network bands, select Give all my Wi-Fi bands the same name.

8. Connect to the new Wi-Fi Name, then return to the setup and click Next.

9. Enter a router password in the Create a router password field, then click Next.
If your router displays an Add a password hint option, enter your preferred hint in the field. This will help you remember your router password in the future.

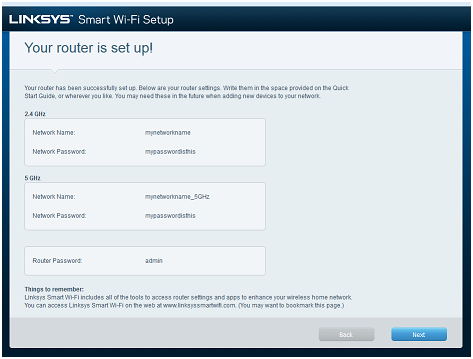
10. If you see the Your router is set up! message, this means that your router is now successfully set up. The new WiFi settings, as well as the router admin password, will be displayed. Make sure to write down the new settings on the Quick Start Guide for future reference. Click Next to complete the entire setup.
You have now successfully set up your Linksys Smart Wi-Fi Router using the Smart Setup Wizard.
Find out more:
How to turn OFF my router’s or gateway’s Wi-Fi

