


Velop WRT Pro 7 supports the major internet provider connection methods, including NTT FLET’S Hikari IPv6 IPoE lines. You can connect using protocols such as MAP-E, DS-Lite, IPIP, PPPoE, and more. Official support for each provider’s service will be announced sequentially.
Easy Internet Setup Check Chart
Refer to the easy initial setup check chart below and proceed to the required configuration steps. Since Velop WRT Pro 7 is pre-configured at the factory, it can be used immediately with many internet providers without any additional settings. For NTT IPoE lines, you will need to install the Auto IPoE script separately. If you have a Hikari Denwa (fiber phone) subscription and a home gateway is already installed, Velop WRT Pro 7 will connect automatically via DHCP, so you can simply place it under the HGW and you’re done.

If you do NOT have an NTT FLET’S Hikari Denwa contract
Please download and use the dedicated module “Auto IPoE” for NTT IPoE lines (IPv4 over IPv6 services).
List of VNEs compatible with IPv4 over IPv6 on the NTT FLET’S network (MAP-E / DS-Lite / IPIP)
- v6 Plus (map-e / ipip)
- OCN Virtual Connect (map-e)
- BIGLOBE IPv6 Option (map-e)
- transix (ds-lite / ipip)
- Cross Pass (ds-lite / ipip)
- v6 Connect (ds-lite / ipip)
- OCX Hikari v6IX (ipip)
Both DHCPv6-PD /56 prefix lines and RA /64 prefix lines are supported. It can also work in environments with a Hikari Denwa HGW installed, but installation directly under the ONU is recommended.
IPoE setup procedure
① Download Velop WRT Pro 7 “Auto IPoE” module![]() and save it in advance.
and save it in advance.
② Log in to the LuCI management page using a web browser (default: 192.168.1.1).
③ Select the System > Software menu.

④ First, click Update lists… to update the package list.

⑤ If the update succeeds, the downloaded details will be shown as below. Click Dismiss to close it.

If Error is displayed, perform the list update in step ③ again. Even though your internet settings are not configured yet, IPv6 communication on an NTT IPoE line does not require configuration, so it is already connected. If you cannot download anything at all, the cable may not be connected correctly, or your IPoE line subscription/provisioning may not be active yet.
⑥ Next, click Upload Package.

⑦ Select velop-auto-ipoe_1.x_all.ipk from Browse… and click Upload.

⑧ A confirmation screen appears. Click Install to proceed.

⑨ Install the Velop WRT Pro 7 IPoE connection setup script and related opkg files.

⑩ If "installed in root is up to date." is displayed, click Dismiss to finish.

⑪ Select Services > IPoE Assistant. If the menu does not appear immediately after installation, reload the entire page in your browser.

⑫ Click “Run Auto IPoE”. The program will automatically detect your line and establish an internet connection a few minutes later.

⑬ When the process completes, a “Start Service” dialog appears and setup is complete. When clicked, the router will reboot within several tens of seconds.

Thank you for completing the setup. After the router reboots and a few minutes pass, you will be able to access the internet via IPv4 over IPv6. Because the setup involves downloading files, a Windows/Mac/Linux PC is recommended. However, since the design allows setup using only a browser with no app required, it can also be done from a smartphone such as an iPhone.
⑬ Only for MAP-E-based services, an additional Gaming Settings menu is displayed. This feature assigns a dedicated port set to a gaming device to improve NAT type. (For a full gaming experience, a fixed-IP service with no port sharing is recommended.)

If you DO have an NTT FLET’S Hikari Denwa contract
If you have an NTT FLET’S Hikari Denwa contract and a home gateway is installed, you do not need to install the IPoE connection setup script above. It will work as-is, but because the HGW and Velop WRT Pro 7 IP addresses overlap, change Velop WRT Pro 7’s IP address from the default 192.168.1.1 to a non-overlapping address such as 192.168.10.1 before use. No other settings changes are necessary.
If you have a Hikari Denwa contract and a home gateway (HGW) is installed, the already-installed HGW handles the IPoE connection. Therefore, Velop WRT Pro 7’s WAN can remain at the factory default DHCP automatic setting. However, if the IP address overlaps, change it. You can continue using the pre-configured SSID/password and other initial settings as they are.
For other internet service providers
In many cases, it will work with automatic DHCP, so Velop WRT Pro 7 can connect to the internet with the factory default settings (DHCP automatic for both IPv4 and IPv6).
In general, no additional work is required. Many providers such as au Hikari, eo Hikari, NURO Hikari, SoftBank Hikari, J:COM, iTSCOM, and other carriers (power-company providers, cable TV providers, etc.) supply a modem or home gateway. Since Velop WRT Pro 7 is pre-configured, simply connect it to those devices and power it on to get online. You can also start using WiFi immediately by entering the SSID and password shown on the bottom of the unit.
Only if the upstream home gateway uses a fixed IP address of 192.168.1.1 and it conflicts, you must change the router’s IP address before connecting Velop WRT Pro 7.
For connection methods not covered above, such as PPPoE or fixed IP
You can also configure PPPoE (the traditional method of entering an ID and password), fixed IP, IPIP, and other methods. By leveraging the flexibility of the OpenWrt-based OS, you can also use mixed connection methods that are difficult on typical routers—for example, using IPv6 via IPoE while using IPv4 via PPPoE at the same time.
On NTT FLET’S lines, if your provider issues a PPPoE username and password, you can use IPv4 PPPoE and IPv6 IPoE simultaneously. Services like YouTube will automatically use IPv6 IPoE, while IPv4-only sites will use IPv4 PPPoE.
PPPoE connection setup procedure
① Open the LuCI management page in a web browser (default: 192.168.1.1).
② From the top menu, go to Network > Interfaces.

③ Click the Edit button for the WAN interface.

④ From the Protocol drop-down menu, select PPPoE and click Save.

⑤ If a confirmation appears asking whether to change the protocol, click Switch protocol.

⑥ Enter the PPPoE username and password based on the documents provided by your ISP, then click Save and go back.

⑦ You will see "pending changes" on the WAN display. This indicates that the changed settings are waiting to be applied. Click "pending changes".

⑧ Click Save & Apply to apply the settings; services related to the interfaces will restart.

For fixed IP method (ipip6)
By installing the Auto IPoE module, you can use standard IPIP settings as well as the “Japan standard provisioning method (HB46PP)”. It is available with many services.
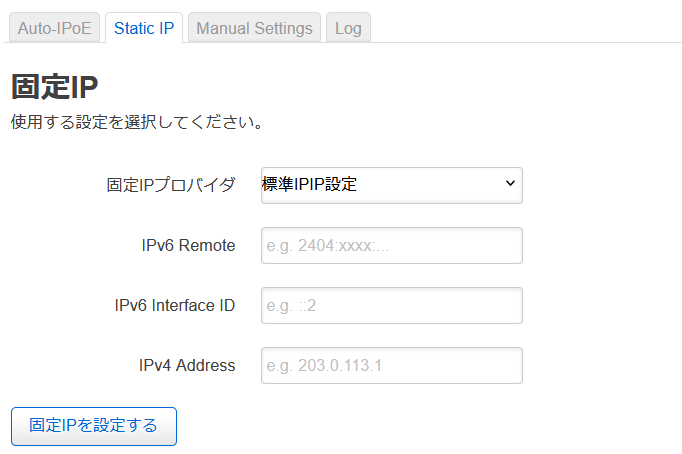
If you use an IPIP fixed-IP service in an environment with a Hikari Denwa home gateway, you must disable the HGW’s DHCPv6-PD multi-prefix distribution and switch to RA distribution. Also, in an RA-only environment without a Hikari Denwa contract, you cannot use a fixed-IP service if you connect through an HGW. Connect the router directly to the ONU.
Bridge mode / Wireless Access Point setup procedure
Even if you have an upstream home gateway or main router, Velop WRT Pro 7 can generally be used without issues with the default settings. However, for business use, or if you specifically want to change from DHCP automatic router mode to access point/bridge mode, install the module below.
How to configure Wireless Access Point / Bridge mode from the LuCI Web management screen
Changing settings via the GUI can require surprisingly many steps, so we prepared a module that can apply everything at once with minimal input fields. Please use it.
Reference: menu screen 
Auto IPoE module update history
- 2025/5/7 ver1.4 - Cross Pass (dslite) support, additional error handling, etc.
- 2025/6/26 ver1.5 - DS-Lite v6mig support, transix (dslite) support, etc.
- 2025/7/11 ver1.52 - IPIP v6mig support, IPIP routine implementation, etc.
- 2025/7/17 ver1.53 - UI fixes, SNAT processing improvements, etc.
- 2025/7/20 ver1.54 - Improved setup routine when deploying CE under an HGW, etc.
- 2025/7/30 ver1.55 - Support for manual IPIP connection settings, etc.
- 2025/9/25 ver1.58 - Added support for Asahi Net (ds-lite, ipip), Cross Pass (ipip)
- 2026/2/16 ver1.61 - Added support for OCN Virtual Conenct (map-e), etc.
Related information
- Linksys Velop WRT Pro 7 Product Information and Setup Guide
- Linksys Velop WRT Pro 7 Frequently Asked Questions (FAQ)
- Linksys Velop WRT Pro 7 Setup Methods by Internet Service
- How to set up Linksys Velop WRT Pro 7 as Access Point / Bridge Mode and as a WDS child unit
- Linksys Velop WRT Pro 7 Related Articles Search Results

