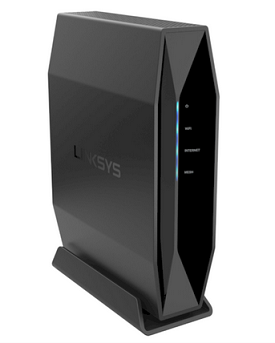
Say Hello to the Linksys E9450
The Linksys E9450 WiFi 6 Router is a Dual-Band router with the 802.11ax standard that delivers extremely fast speeds of up to 5.4 Gbps. It also features the next-generation WPA3™ encryption to provide a more robust security for your network.


- Dual-band AX5400 at up to 5.4 Gbps
- 802.11ax wireless technology
- 2x2 + 4x4 Spatial streams (six streams)
- WiFi coverage of up to 2,500 sq ft
- Support parent and child nodes
- Parental Controls
- Wi-Fi Protected Setup™ (WPS)
- WPA2™ and WPA3 wireless security
- Buttons and switch:
- Reset button
- WPS button
- Power switch
- Ports:
- Power port (12V, 2A)
- Four gigabit ethernet ports
- One gigabit internet port
- One USB 3.0 port
- Supports FAT32, NTFS, HFS+
- SMB v1.0
- UPnP®
- Supports FTP and Media server features with the latest firmware
- Working internet connection
- Latest version of Google Chrome™, Firefox® or Safari®
- Linksys E9450
- Quick start guide
- One ethernet cable
- One power cable
The hardware version is located beside or beneath the model number and is labeled version, ver., or V. If there is no version number beside the model number on your Linksys product, the device is version 1. If you still have trouble finding your version number, see the complete article to learn more.
- Firmware
- Ver. 1.1.00.076
- Latest Date: 9/20/2022
- Download 36.1 MB
- Release Notes
- English
Disclaimer: This user guide is for US customers only, as other countries have different hardware.
Ready to explore your router's settings?
Launch the web interface emulator to get started. This replicates the real router interface for demonstration purposes only.
1. Connect your modem to the Linksys router and then power it ON.
2. Connect a wireless computer to your router's default WiFi.
3. Open a web browser, enter “http://myrouter.local” or “http://192.168.1.1” in the Address bar, and hit [ENTER].
4. This will prompt the setup wizard to begin automatically. Follow the on-screen instructions to set up the router successfully.
Are you still having trouble setting up your router? Click More for additional help.
1. Log in to the router's web interface.
2. Click the Configuration tab.
3. On the left side of the screen, click Wi-Fi.
4. Click Basic Wireless Settings or Wireless Security.
5. Enter or select the settings you want to change. Click Save once done.
1. Press and hold the reset button at the back of the router for 10 seconds, then release.
The power light on the front of the router will turn OFF and will start blinking blue.
2. Once the power and WiFi lights on the Linksys E9450 are solid blue, the router is ready for setup.
Select each category below to view the articles.
- Linksys E9450 (US model) FAQs
- Overview of the Security settings for the Linksys Dual-Band WiFi Router
- Overview of the Administration settings for the Linksys Dual-Band WiFi Router
- Overview of the Troubleshooting settings for the Linksys Dual Band WiFi Router
- Overview of the System Status settings for the Linksys Dual-Band WiFi Router
- Overview of the Connectivity settings for the Linksys Dual-Band WiFi Router
- Light behavior of the Linksys E9450
- Linksys E9450 USB feature overview
- Changing the WiFi settings of the Linksys Dual-Band WiFi Router
- Changing the router password of the Linksys Dual-Band WiFi Router
- How to log in to the Linksys Dual-Band WiFi Router's web interface
- Connecting devices using Wi-Fi Protected Setup™ (WPS) of the Linksys Dual-Band WiFi Router
- Enabling Guest Access of the Linksys Dual-Band WiFi Router
- Configuring the Parental Controls feature of the Linksys Dual-Band WiFi Router
- Upgrading firmware of the Linksys Dual-Band WiFi Router
- How to reset the Linksys E9450 router to factory default settings
- How to configure MAC address filtering on a Linksys E9450 router
- How to configure the Wireless MAC filtering on the Linksys Dual-Band WiFi Router
- Backup and Restore configuration of the Linksys Dual-Band WiFi Router
- How to configure the QoS for device prioritization of the Linksys Dual-Band WiFi Router
- Configuring the Time Zone setting on the Linksys Dual-Band WiFi Router
- How to configure Single Port Forwarding on the Linksys Dual-Band WiFi Router
- How to change the language of the Linksys Dual-Band WiFi Router web interface
- How to configure Port Range Forwarding for the Linksys Dual-Band WiFi Router
- How to check the DHCP Client Table on the Linksys Dual-Band WiFi Router
- Enabling the Remote Management Access of the Linksys Dual-Band WiFi Router
- Enabling DDNS on the Linksys Dual-Band WiFi Router
- How to configure DHCP reservation of the Linksys Dual-Band WiFi Router


