It is important to change the basic WiFi settings on your Linksys Dual-Band WiFi Router to establish a unique and secure connection. A protected WiFi prevents unwanted access to personal information.
Follow the steps below to change the WiFi settings of the Linksys Dual-Band WiFi Router.
Before you begin:
- Changing your WiFi settings will disconnect all wireless devices from your router. You must reconnect them using the new settings.
Changing the WiFi or Network Name (SSID)
1. Log in to the router's web interface.
2. Click the Configuration tab.
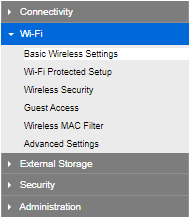
3. On the left side of the screen, click Wi-Fi.

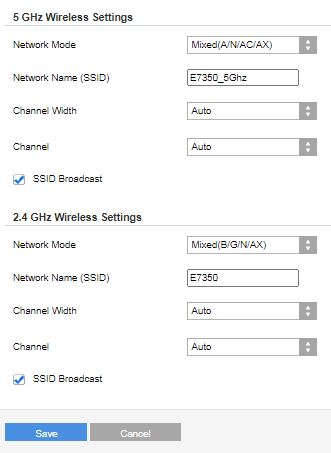
4. On the Basic Wireless Settings screen, enter the new Network Name (SSID) for both the 5 GHz and 2.4 GHz bands. The options will vary depending on the frequency and model of your router. Also, if you have EasyMesh™ enabled, some options are limited.
NOTE: If you have an EasyMesh network composed of parent and child nodes, all updates will automatically sync to the rest of your child nodes once an update is done on the parent node's WiFi settings.

QUICK TIP: It is recommended that you leave the Channel on Auto. However, you can select another channel if you need to troubleshoot any WiFi issues. The available wireless channels may vary depending on your region.
5. Click Save.
2. Click the Configuration tab.
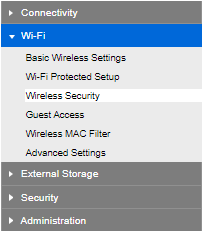
3. On the left side of the screen, click Wi-Fi.
4. Click Wireless Security.

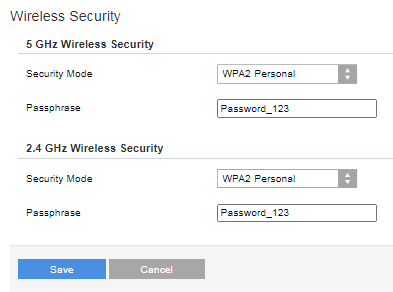
5. Enter the new WiFi password or Passphrase for both 5 GHz and 2.4 GHz bands. You can also change the Security Mode of your router in this screen.
NOTE: The Security Mode options vary by model and are limited when EasyMesh is enabled.

6. Click Save.
The WiFi settings of your router have been successfully changed.
If you changed the settings using a WiFi client and you are unable to connect using the new settings, you may have to edit your wireless profile to match the new settings or delete the wireless profile and connect it using the new settings. Learn more.


